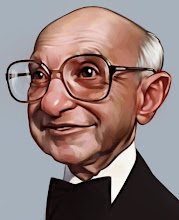
Leyendecker was a genius.
Thursday, April 07, 2011

Tuesday, March 22, 2011
Character
 So I'm walking to my car yesterday with my latest drawing in tow thinking about how pleased I am with the results when a big gust of wind blows it right out of my hands and down the street into traffic and way too fast to chase. I followed a bit but had to give up because of an urgent appointment. Maybe 20 minutes later I decided to drive by just to see if I could see it. I drove 2-3 blocks and as I was ready to give up I see my drawing tumbling by my passenger window. I pulled over and it dutifully attached itself to a parking meter for me to pick up.
Just like a disobedient little dog that wants to run around but in the end is happy to go home. I'm glad I found it and I suppose the experience adds character to the piece.
On a side note: My favorite art in the entire world is Alphonse Mucha's Slav Epic. I searched for years for good large digital copy's and finally found some here, also more great links here.
Thursday, March 03, 2011
sketch 40
 Sorry for the lack of posts, work has been breaking me down for a while now. And after a sad sports night I had to get something positive so I got the sketchbook, this drawing turned out pretty good. That much black space is hard to cover with my little .3mm mechanical pencil.
If your in the mood for some great art visit this new sight by my favorite artist around Doug Fryer.
Monday, January 31, 2011
sketch 39
 My friends kid, I want to do a full digital painting of this in the near future.
I actually was having a really hard time getting the likeness, my wife said I was close but I didn't believe her. So I tried twice then got out the tracing paper(no, not to trace the photo) to use my handy tracing paper method. I assume I was getting closer but the next day I couldn't tell which was the most recent drawing. Anyway, once I got in there and darkened the eyes, which I typically wait to do because it is hard to erase if you miss, it looked good. I think I wasn't feeling the likeness because this little girl has big pretty dark eyes and it didn't feel right until they were there.
Thursday, January 20, 2011

Tuesday, January 11, 2011

Tuesday, January 04, 2011
sketchbook #37
 I asked my wife if she thought people would be getting sick of non-stop pictures of my little girl. My wife said no because she is pretty. So once again here is another drawing of my pretty daughter. This one feels pretty good to me, I got away from the sketchbook for a while there and could see my drawings getting sloppy. So I've been back at it and there getting better, just got to get back on that bike.
A couple posts down the drawing was done for a painting so its messy, this is done to look finished.
Wednesday, December 22, 2010
Santa
 A quick pic for the Avalanche blog "Speed Santa" topic, and for Christmas, although it may not entirely be in keeping with the spirit. The blog is showing signs of life (Death throes?)
Merry Christmas all the same.
Wednesday, December 15, 2010
study
 A study for a painting(I hope). Kind of rough and choppy, but I am much more interested in correct proportions than a nice drawing.
By the way, Scott Waddell has some very nice drawing demonstrations that he has been posting to his blog, check them out for some good pointers.
Wednesday, December 08, 2010
figure drawing

Last weeks figure drawing done in my sketchbook. 9"x12" mechanical pencil on regular old sketch paper. When I am in my sketchbook I usually stay away from rendering the whole figure because it is a lot more difficult to shade large areas with a tiny point so i prefer to focus on the face.
Wednesday, December 01, 2010

Thursday, November 18, 2010
fig. 43
 I've got a newish technique I've been using in my figure drawings lately that seems to be working out. I am not very happy with how hi-key the drawings are but its been something I am not aware of as I am working, only later. So something to work on.
Tuesday, November 16, 2010
Oil painting practice
 I am pretty sure coming up with good ideas is the hardest part of painting a picture. I'm stuck in an idea rut right now so decided just to do some master copies, this philosophy works well for drawing why not painting? Although I never get a nice finished piece, I am getting better and that's what I prefer.
So this is a Thomas Dewing work in my top 3 favorite paintings of all time and if you are a long time follower of the blog you may remember this copy done years ago in the digital medium. Don't pay too much attention to the drawing because it is off(though not as far off as that old digital version, ugh) but then that is not the intention. It's the painting that is the focus and I am very happy with how the brushwork turned out although the colors can also use some work. There is another practice copy going on at the bottom of the picture to show you how I just use it like a page in my sketchbook, drawing wherever I've got enough space. This makes me excited to get back to doing a painting of my own after this.
Thursday, November 11, 2010

Friday, November 05, 2010
Figure #42
 Last weeks figure drawing. While this was done on my sketchbook 9"x12" with my trusty .3B mechanical pencil, I've really warmed up to a new technique with my large figure drawings and as soon as I get around to getting some pictures I'll describe it.
Bonus! if you look close you may be able to see the llama portrait I drew last night.
Tuesday, October 26, 2010

Wednesday, October 13, 2010

Monday, October 11, 2010

Monday, October 04, 2010
Hoopes
 A figure drawing from a few weeks back. done with Conte on 18"x24" drawing pad. Conte is nice to draw with but very hard to erase so it's tricky, whereas the Nu Pastel I usually use is easily smudged and also easy to erase but harder to control. So I've always been torn on which to use, this one turned out good because I just sat down and drew it, instead of building it slowly with layers. So I have just started doing a combination of the two. I will show one of them pretty soon.
*For coworkers, this is not Mike Hoopes, just a model that happens to be his doppleganger.
Monday, September 27, 2010
Bandana
 *Updated color adjustments*-looked good on my home screen but terrible at work, this should be better.
My baby all dressed up, current progress. Done using the drawing in the earlier post. I was planning on leaving it alone for now, then I was smart enough to put it out where it got paint flicked on it from another painting I've got on the easel.
Oil on board 9"x12"
Thursday, September 23, 2010

Wednesday, September 08, 2010

Monday, August 23, 2010
Exercise
I've talked about this drawing exercise before, but I am so convinced it is great practice I will share it again. It comes from the great William Whitaker so it can be trusted. Note, this is not how I learned to draw but it would have saved me a lot of time on the journey. I've included some examples below.
step #1 - Get a pad of tracing paper. Set it up on an easel or whatever, close to a photo/model that you want to draw.
step #2 - Draw the subject. Try to do as much measuring as you can. Measure the distance between features with a straight object. Stand at least arms length, close an eye, hold your arm straight and use the end of the pencil and your finger (this is a useful technique for life drawing too). You'll get something fairly rough.
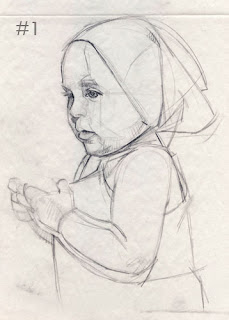 step #3 - Now step back and squint you should be able to see some structural problems. Tear off the drawing and put it underneath the next page and trace only the correct lines. Next, pull away the drawing #1.
step #4 - Now you've cleaned out a bunch of messy measurement lines. With the new simplified lines as a base, re-draw the subject. You should get closer this time around. Continue to step back and squint to find all the problems.
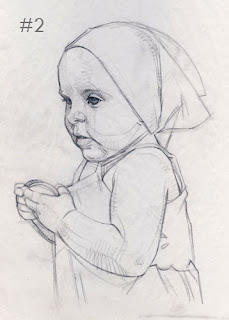 step #5 - Repeat 4-5 times.
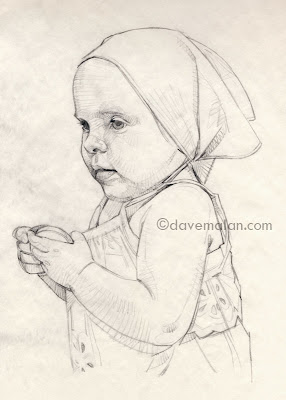 Now this is never intended to be a nice finished drawing and it's not beautiful, but it should help get you closer and closer to accuracy with each iteration, you can transfer it to good paper and do a nice drawing or use it for a painting.
You are learning to see. Most people can handle a pencil just fine but seeing where a line should be is much more difficult and takes a lot of practice. Another very important trick for drawing is putting a line down. It doesn't have to be right just put something there and you can then use that line as a fixed point to decide it you are too low/high/long/short/left/right.
This is the basic measuring process I use for every drawing but all together at once on one page and without the tracing paper. This method is just a good way to break it down and take a more analytical approach which helps with learning and makes problems more apparent.
step #1 - Get a pad of tracing paper. Set it up on an easel or whatever, close to a photo/model that you want to draw.
step #2 - Draw the subject. Try to do as much measuring as you can. Measure the distance between features with a straight object. Stand at least arms length, close an eye, hold your arm straight and use the end of the pencil and your finger (this is a useful technique for life drawing too). You'll get something fairly rough.
 step #3 - Now step back and squint you should be able to see some structural problems. Tear off the drawing and put it underneath the next page and trace only the correct lines. Next, pull away the drawing #1.
step #4 - Now you've cleaned out a bunch of messy measurement lines. With the new simplified lines as a base, re-draw the subject. You should get closer this time around. Continue to step back and squint to find all the problems.
 step #5 - Repeat 4-5 times.
 Now this is never intended to be a nice finished drawing and it's not beautiful, but it should help get you closer and closer to accuracy with each iteration, you can transfer it to good paper and do a nice drawing or use it for a painting.
You are learning to see. Most people can handle a pencil just fine but seeing where a line should be is much more difficult and takes a lot of practice. Another very important trick for drawing is putting a line down. It doesn't have to be right just put something there and you can then use that line as a fixed point to decide it you are too low/high/long/short/left/right.
This is the basic measuring process I use for every drawing but all together at once on one page and without the tracing paper. This method is just a good way to break it down and take a more analytical approach which helps with learning and makes problems more apparent.
Monday, August 16, 2010

Monday, August 02, 2010
Flower sculpture
 *Update- the sculpture is "Nymph of the Fields", 1915, by Pittaluga, thank you very much Jane*
A new digital painting mainly as practice. Another sculpture I photographed somewhere at sometime but have lost track of the name or location. If you know where it is let me know. Maybe I'll do some more searching to narrow it down because it is a beautiful statue.
This type of painting is mainly value a value study since the color range is so limited. But it is still good practice.
Here's a little tour of previous statue paintings in case your interested:
-Prague cathedral
-National Gallery
-National Gallery 2
Monday, July 26, 2010
The Old Man and the Sea *alternate ending*
 From the below drawing which may or may not have been produced in a long meeting. Finally a little color around here.
It's been a while since I read the book so it may not be entirely accurate.
Thursday, July 22, 2010
color?

I need to get some color back into this blog. Here is a study that I really hope I can get some time to paint because I like how it turned out. Cross your fingers.
Monday, July 19, 2010

Monday, July 12, 2010

Tuesday, July 06, 2010

Subscribe to:
Posts (Atom)