Showing posts with label Oil Painting process. Show all posts

Tuesday, June 03, 2014

Dinner- paint 5

After finishing up some other projects I'm back to this painting of the kids. It's coming along. Compare this second pass at the baby to the first pass here.
The real tricky part is getting the paint styles to match up, I am seeing a problem with each kid is painted slightly different because of their being painted on different days. I figure I'll have to just keep going at them but that could also be a problem as I want to keep the style loose with shadows that are transparent. We'll see I guess.

Thursday, April 17, 2014

Dinner- paint 4


My boy in the center is rendered out just like I want. My little girl is still kind of flat but I like the colors as of now. And the baby looks nice and innocent but he's still early too.

Oil on board 24" x 36"

Friday, April 11, 2014

Dinner- paint3


The third figure it coming along.

Monday, April 07, 2014

Tuesday, April 01, 2014

Dinner- paint1

I'm starting into a new piece I am pretty excited about. I feel like I'm hitting a stride with oil painting lately. Looser, a little more impressionistic with the strokes and the colors. This is day 1 about 5 hours in. The face is washed out some. I think this one might be hard determining when to leave things alone and when to continue to develop. Wish me luck.

This is related to the drawing posted below.

Friday, November 18, 2011

busy

I've been busy lately but for now here is a early stage of this painting.

Tuesday, November 16, 2010

Oil painting practice

I am pretty sure coming up with good ideas is the hardest part of painting a picture. I'm stuck in an idea rut right now so decided just to do some master copies, this philosophy works well for drawing why not painting? Although I never get a nice finished piece, I am getting better and that's what I prefer.
So this is a Thomas Dewing work in my top 3 favorite paintings of all time and if you are a long time follower of the blog you may remember this copy done years ago in the digital medium. Don't pay too much attention to the drawing because it is off(though not as far off as that old digital version, ugh) but then that is not the intention. It's the painting that is the focus and I am very happy with how the brushwork turned out although the colors can also use some work. There is another practice copy going on at the bottom of the picture to show you how I just use it like a page in my sketchbook, drawing wherever I've got enough space. This makes me excited to get back to doing a painting of my own after this.

Wednesday, February 10, 2010

Tracing paper

A very good trick for getting an accurate drawing before you spend hours on an oil painting only to realize your initial drawing was way off: Do the drawing on tracing paper, then pull out that page and put it under the next page. Trace the lines that are correct then remove the page and do the drawing again. Repeat this process over and over, maybe 5 times or more if needed. Each time you should be able to tighten the drawing and get much closer to the correct proportions. This is the 3rd try at this drawing, the first was not nearly as close but I like this one. Actually the second and third were very similar, its a great exercise and you will get better as you do it.

I plan to paint this soon(I hope).

Tuesday, March 03, 2009

Painting final

So here is the final version of the painting. This step is just the fleshing out and final detail. Obviously this is rougher than my usual style but I've done that purposely. The initial and rough work is done with bristle brushes and the more finished work is sometimes sable but usually Langnickel Royal Sable which I really like at the moment. The Sable and hog bristle are from an online company called Trekell, who have great prices.
I'll probably have this propped up against the wall in my studio for a couple months to see if it feels okay or I may have to go back to it.

You can see each step in the process here.

Sunday, February 08, 2009

Painting painting - step #4

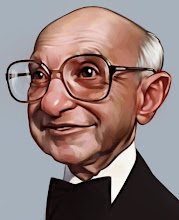
So here is more of the meat of the painting after a day or two of drying time. Again kind of a rougher process then usual but I've enjoyed the more straight forward approach. Similar to my drawing style the face is were I like working, I like the challenge, and the background is more of an afterthought. That's why with this of any other painting the face is done first.
I've laid down an extremely thin layer of walnut oil (non-alkyd) to give the feeling of painting wet on wet but without the messy mixing colors. The colors and draftsmanship are being tightened up at this point. And I am building up the lights, one thing I really like about painting in layers to build the hi-lights over 3-4 stages because it gets a really nice glow especially in good light. I've pushed the sky toward blue but wasn't comfortable with it so it will change.

My mind is muddled so if you have any specific questions come to mind please ask. More to come.
Also note, the step #3 image is awful, this is much better.

Sunday, February 01, 2009

Base painting - step #3

Don't worry it gets better.

So this is step #3 in this painting. If I remember correctly I was in a hurry to get painting so a rushed value under drawing, a quick spray fix, wait 5 minutes and time to paint. I slapped on a burnt umber thin layer with turpentine to thin and painted into it with no medium except more turpentine if needed. That explains the dark colors because anything you paint picks up about as much Burnt Umber as it adds new color. I used a lot of quick loose strokes to get the face and was very proud of it when I was done, only to return the next day to be disappointed (was obviously staring at it too long). I did like the way the brush work looked but not the details of the drawing, no matter there are more steps to come.
Excuse the blown out light values, I'm also still learning to use a camera effectively.

Wednesday, January 21, 2009

Underdrawing - step #2

Step one was the original drawing.
I said in the drawing stage that I would post pictures along the process, but that is a lot of pressure that demands a competent painting. I admit I held off until I could see I would be more or less satisfied withe the result. Another problem with posting my process is that I don't have a set process it changes a lot as I learn. Unfortunately oil painting is only a side job and I don't have enough experience to have a set method.
So here is the underdrawing. It is a new method that I haven't used before but I do like, quick linework then a lot of really loose charcoal scrubbed around with the back of my hand to get a simple value study.
Stay tuned...

Wednesday, December 31, 2008

Drawing - step #1

I have good news as far as galleries for the new year. I intend to be producing a stack of new oil paintings. Here is a new drawing study for a painting. I will try to keep a image record of my process for this one and post it. I hope I don't screw it up.