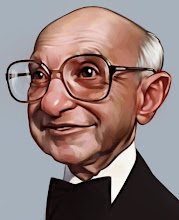
At last, here is the process painting done by starting with this drawing and resulting in this painting. It is extremely jumpy because this is a 3 hour painting reduced down to 2 minutes. I also constantly rotate the painting about 60 degrees to judge it(as you can see in the preview), instead of stepping back.
Here's a quick list of the steps:
- 0:05 - initial drawing lifted to its own layer base color put behind it and then paint some flat colors into the areas.
- 0:10 - shadows added on a multiply layer.
- 0:20 - lighting added in screen layer.
- 0:25 - general coloring done with soft light layer.
- 0:30 - direct painting on a normal layer.
- 0:43 - multiplied green layer added, all the layers were flattened then I blurred the whole thing. This is a new trick I am a big fan of currently.
- 0:45 - back to more direct painting to reestablish my edges and refine all on the flattened painting.
- 1:45 - At this point the rendering is basically done so I go through a long process of finish work experimenting with different gradients, glowing, overlays, lighting, etc. until it feels about right (note: it never feels totally right).
Painted in Corel Painter, mostly using the 2b pencil tool, a little digital felt tip pen. Hopefully it helps, let me know if you have questions and I'll do my best to help.

18 comments:
Awesome, thanks for sharing.
awesome. this is a very practical yet expressive approach. i like how you maintained a close control of the painting process.
Beatifully done. The movie IS very jumpy, I would have loved to see it double the length.
Still fantastic to see it all in action and your written breakdown is very helpful too.
Oh and WOW, never zooming in on the details!
Thank you for a brilliant blog. Always love coming back to se what you have been doing.
Nana
Really nice job!!! Thanks for sharing your process!!!
this is definitely a new approach for me. I dont really use painter i find the learning curve a bit difficult. I wonder if i could pull off something similar i PS. I'll try that blurring thing, seems like a neat trick. thanks!!
very nice. Thanks for sharing.
the painting at 0:09 in a special way looks nice to me.
REALLY nice digital painting! :)
Brilliant!!... anyway. I could watch for hours. Thank you. Mj
Really love the process video. Your work is beyond belief. I really have to get more comfortable with coloring my artwork, I always have so much line art but there just isn't enough substance to that when that is all there is in my sketchbooks
it´s awesome Dave , i like your paint metod
.Your tutorial is very inspirational.
.I´ve learn a lot with you , and i´m waiting your next work.
Congratulations!!!
watching this reminds me of how I felt when I drank 4 jolt colas in a row. Seriously though, I would love to see a slowed down version. Thanks for sharing!
Great work Dave, thanks for the video and the breakdown. Could you tell me what the green multiplied layer does on step 6?
Thanks, Dave T.
Thanks for the comments.
Dave, the Green multiply layer is a good little trick to unify the whole painting and it's colors with the green tint. It could have been any color and really heavy or really light.
Dave, thanks for sharing your process. This is great to see.
It's great ! Thanx for that, it's very interesting to see your painting process.
So bad the video is so small, and that it goes too quickly (?) :/
And the painting is great too, as usual :)
It's great ! Thanx for that, it's very interesting to see your painting process.
So bad the video is so small, and that it goes too quickly (?) :/
And the painting is great too, as usual :)
Wow! After seeing this clip, I realise I have a lot to learn. I do all of my digital stuff on one layer. I have so many questions to ask you about this, I don't know where to start.......
мммм...я чуть не пропустил интересное! А ведь всегда слежу за вашим блогом.
Очень поучительно когда вы соединил слои и размыли картинку..я такого ещё не видел!Навело на размышления.Ооооочень интересно! Побольше бы таких уроков,мастер!:)
Post a Comment