Another drawing done after a russian student drawing from the below mentioned figure drawing book.
Monday, December 28, 2009
Copy #2
Another drawing done after a russian student drawing from the below mentioned figure drawing book.
Tuesday, December 22, 2009
figure #36 *Updated*
Update-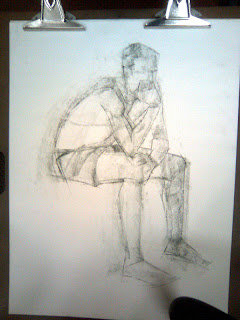 I found this picture taken with my phone of an early stage of the drawing. It will give you an idea of the method. This is about 15 minutes into the 90 minutes drawing. I try to block in and get the gesture right before moving onto any detail.
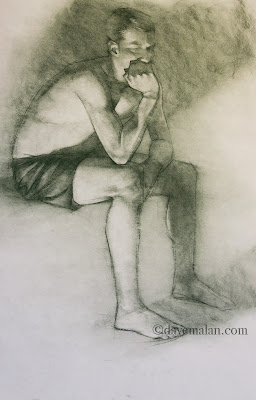 A slightly different arrangement of the lighting made this drawing a 100% more interesting. I was very happy with most of the results.
 I found this picture taken with my phone of an early stage of the drawing. It will give you an idea of the method. This is about 15 minutes into the 90 minutes drawing. I try to block in and get the gesture right before moving onto any detail.
 A slightly different arrangement of the lighting made this drawing a 100% more interesting. I was very happy with most of the results.
Monday, December 21, 2009

Thursday, December 17, 2009

Thursday, December 10, 2009

Tuesday, December 08, 2009
Copy
 I was talking to a young artist recently who told me she never copied, suggesting that it is an incorrect method. I couldn't disagree more, copy everything that you like (don't take credit for it as your own though), the best thing in the world is to learn from the best. Copying forces you to observe closely enough that you actually learn what the artist was doing.
This is a copy of a Russian figure drawing artist from a very good book I recently purchased, done with my .3 mechanical pencil in my sketchbook.
Thursday, December 03, 2009
Painting the classics
At last, here is the process painting done by starting with this drawing and resulting in this painting. It is extremely jumpy because this is a 3 hour painting reduced down to 2 minutes. I also constantly rotate the painting about 60 degrees to judge it(as you can see in the preview), instead of stepping back.
Here's a quick list of the steps:
- 0:05 - initial drawing lifted to its own layer base color put behind it and then paint some flat colors into the areas.
- 0:10 - shadows added on a multiply layer.
- 0:20 - lighting added in screen layer.
- 0:25 - general coloring done with soft light layer.
- 0:30 - direct painting on a normal layer.
- 0:43 - multiplied green layer added, all the layers were flattened then I blurred the whole thing. This is a new trick I am a big fan of currently.
- 0:45 - back to more direct painting to reestablish my edges and refine all on the flattened painting.
- 1:45 - At this point the rendering is basically done so I go through a long process of finish work experimenting with different gradients, glowing, overlays, lighting, etc. until it feels about right (note: it never feels totally right).
Painted in Corel Painter, mostly using the 2b pencil tool, a little digital felt tip pen. Hopefully it helps, let me know if you have questions and I'll do my best to help.
Tuesday, December 01, 2009
Color
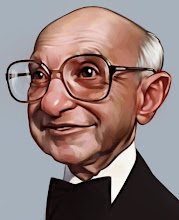
 The color version of the below post. You'll notice the shapes have changed a bit. A new trick I like to use is distorting the drawing in Photoshop before I get into the painting. Often I feel like my drawings are pretty static, the distortion can push it and make the shapes more interesting. While I was painting I thought of a superb little economics lesson by Milton Friedman about a pencil, so I decided to focus his eyes on that.
I plan to get that video up this week. I'll probably say a couple more things about my process in the next post.
Subscribe to:
Posts (Atom)